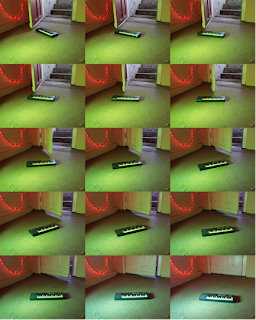
Have you ever drawn objects on the corners of binder papers or Post-its? Drawing the images slightly different, then bringing them to life by flipping through them with your thumb?
Well, that’s what is called stop-motion animation. It’s a cinematic process or technique that brings static objects to life. You see it everywhere: In Tim Burton’s films such as “Corpse Bride” and “The Nightmare Before Christmas,” or with the clay humanoid known as Gumby.
Stop-motion animation is nothing new. It can be dated back to Eadweard Muybridge, a well-known 1870s English photographer who conducted a series of motion studies.
It’s fun, easy to do and looks extremely cool. And guess what? I’m going to teach you how to do it. All you need is a camera, computer, and an idea. Beware, though – the process is time consuming, repetitive and requires patience.
Shoot the Animation
You first need an idea, so think of something that would motivate you creatively. Think of what would be exciting to see that isn’t visible in this thing we call “real life.” My example that I am going to provide requires a keyboard and a light fixture for a subtle effect.

After you have an idea, shoot your photos. Pick a vantage point, and subtly move the object after shooting each still frame. Remember, though: Stay consistent and try to keep the vantage points the same. Having a tripod is a big help.
If you make a mistake, then go back and delete the frame. This makes the editing process a lot easier and shorter.
This process is also one of the longest. You can easily take 100 photos for only 10 seconds of animation.
Transfer Photos to the Computer
After you’re done shooting the pictures, transfer the photos to your computer. Since I’m on a Mac, this may vary from user to user. Import the photos to iPhoto and give the album a name. Once you have completed this step, close iPhoto and open iMovie.
Import Photos to iMovie
PC users can download a fairly easy-to-use program called JPGVideo, but for this tutorial I will be using iMovie.
Once you have opened iMovie and named your project, import the photos. This is really easy to do. Click on the “Photos” tab or use the shortcut key, Command–2, and drag the album of stills to the timeline.

Animate the Photos in iMovie
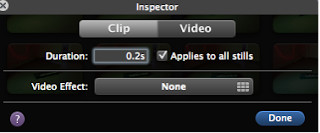
Now that you have your photos in iMovie, you need to tell iMovie how long you want each still to appear before the next. This will only be for a fraction of a second. To do that, press “I” on your keyboard, or go to “Window” then “Clip Adjustments.” It should look like this:

Now that you have that window open, you are going to choose the duration. This is the time each still will be seen before the next. You can think of it as a slideshow, but you are manually speeding it up.
As you can see in figure three, I have it set at a little less than a quarter of a second. At this duration, you are going to see five frames a second. Now you can see why we need to take so many photos! Once you have chosen the duration, check “Applies to all stills.” This is very important, and also saves us a lot of time in the editing process.
We are almost done, so stick with me!
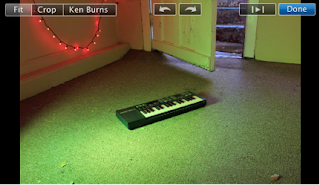
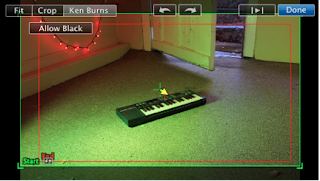
By default, iMovie adds “Ken Burns,” a panning and zooming effect, to all photos. Unless you like the effect, my suggestion is to turn it off.
To do this, select your first clip then scroll down, press and hold “Shift” and select the last clip. Now that all your frames are highlighted, press “C” on you keyboard and then click “Fit.” Once you have done this, click the “Done” tab.


Here’s the exciting part!
Now that you have turned off the Ken Burns, you can view it. Do that by clicking “Play” or pressing the spacebar and … voila! You have created your first stop-motion animation!
Icing on the Cake
You can fine-tune your animation by adding a cool tune to it and slow down or speed up the duration of each frame. To add a song, just choose one from iTunes and drag it to your timeline.
You can also share your work. To do that you will need to export it. Go to “Share,” then “Export Movie.” Choose a size and where you would like it to be saved, then click “Export.”
So that’s it! Don’t forget to save your project as you go along with the editing process – you don’t want to lose that precious time you spent editing!
Some Stop-Motion Examples
Coldplay – Every Teardrop Is a Waterfall
The Story About Stop Motion…told in stop motion.
Rymdreglage – 8-bit trip
Trim Stop Motion: A really cool stop-motion video that includes trimming a beard and artistic expression
Address is Approximate: “A lonely desk toy longs for escape from the dark confines of the office, so he takes a cross country road trip to the Pacific Coast in the only way he can – using a toy car and Google Maps Street Views.”


This is a great break down!
ReplyDeleteVery cool. Going to try this at home!
ReplyDelete